Ready to build a quilt around that stunning fabric panel you’ve been saving? When you only get one shot at cutting into it, planning matters and we’re here to help!
Fabric panels are different from traditional fabric designs. Instead of a solid color or repeating design, a panel is essentially a printed image on fabric almost like a photograph on cloth.
And yes, you can plan a panel quilt in Quiltster! But there’s one important thing to understand first:
Quiltster was originally designed for standard fabrics, not pictures.
So panels don’t always behave perfectly when you load them. That doesn’t mean you can’t use them, it just means you need to help Quiltster a little.
This guide will show you exactly how to:
- How to edit and load your own panels
- How to find and use pre-loaded panels
How to Edit and Load Your Own Panels
Step 1: Choose a Panel-Friendly Pattern
We are starting to add panel-friendly patterns into the Quilt Planner, along with templates specifically for different sized panels.
One example is the pattern, Alpine Tracks. This is a foundation paper pieced design that frames a center panel and lets you audition border fabrics before you cut anything.
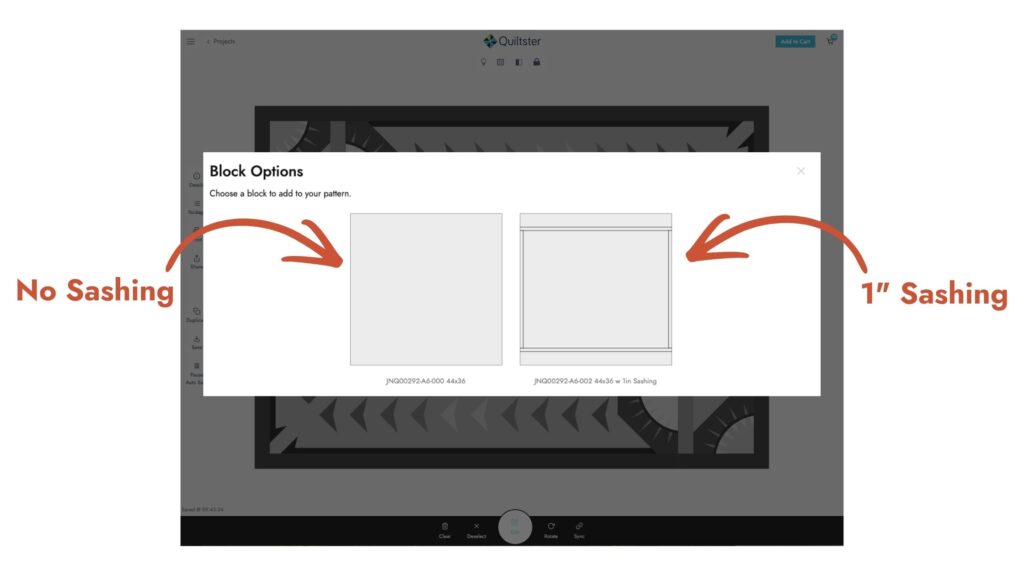
These patterns load as Mixer patterns in Quiltster. The panel block inside the pattern is the mixer portion which includes block designs for a variety of sashing options (decorative strips around the panel).
You’ll see options for:
- No sashing
- ½” sashing
- 1″ sashing
Step 2: Pick the Correct Template Size & Orientation
Fabric panels are not standardized. This is honestly the #1 reason people struggle with them.
- First, find the size of the fabric panel you want to use.
- Next, choose the corresponding template.
We have built templates showcasing three popular panel sizes:
Quilt Size | Panel Size it Fits (WOF) |
48″ × 68″ | 24″ × 44″ |
54″ × 68″ | 30″ × 44″ |
60″ × 68″ | 36″ × 44″ |
When you open a panel-friendly pattern in Quiltster, you’ll see six template options representing each size offered in both:
- Horizontal (landscape)
- Vertical (portrait)
***Always choose the orientation that matches your panel image.

Pro Tip: Sashing Lets Smaller Panels Fit
The sashing options actually change the usable panel space. Because the sashing sits inside the panel opening, it slightly reduces the size of the area your panel fills.
For example: The 54″ × 68″ quilt normally fits a 30″ panel.
If you choose the 1″ sashing option, you can successfully use a 28″ panel because the sashing fills the extra space.
So if your panel is almost the right size, you may be able to make it fit simply by selecting a wider sashing option. Scroll down to “When Panel Sizes Aren’t Exact” below to read more about using a variety of panel sizes in your projects.
Step 3: Preparing Your Panel Image
This is the step that determines whether your panel looks great or distorted.
Quiltster requires square images when uploading fabric. Panels, however, are rectangles. So if you upload a rectangular image directly, Quiltster will automatically force it into a square resulting in a stretched out, distorted image.
That’s why panels look “squished” or warped when loaded in their original state as rectangles.
To prevent this, you must edit the image before uploading.
Create a Custom Canvas
You will need to place your rectangle panel onto a perfect square canvas before uploading it into Quiltster.
We recommend starting with a canvas size of 44 inches. (44″ x 44″). You may also try creating a canvas square sized that is equal the longest dimension of your panel if the 44″ square doesn’t display correctly in your project.
Open a photo editing program such as Photoshop or Canva. We use Canva in our tutorials as it is easy to navigate and it has a free version that you can use to edit your own panels before loading into Quiltster.
- Create a custom canvas.
For example: If your panel size is 30″ × 42″
Your square canvas should still be: 44″ × 44″
- Upload the panel image into your photo editing program.
- Add the panel to your canvas.
- Center the panel on your canvas. Make sure it goes from end to end on the longest side.
- Export your new panel image on a square canvas to your computer. It’s now ready to import into Quiltster.
Tips:
- It is best to use the images provided by the fabric company.
- You may see the canvas around your image and that’s okay. The white space exists only on the extra canvas space and will not appear in your finished quilt. Because the panel block is rectangular, Quiltster only displays the portion of your square image that fits the block.
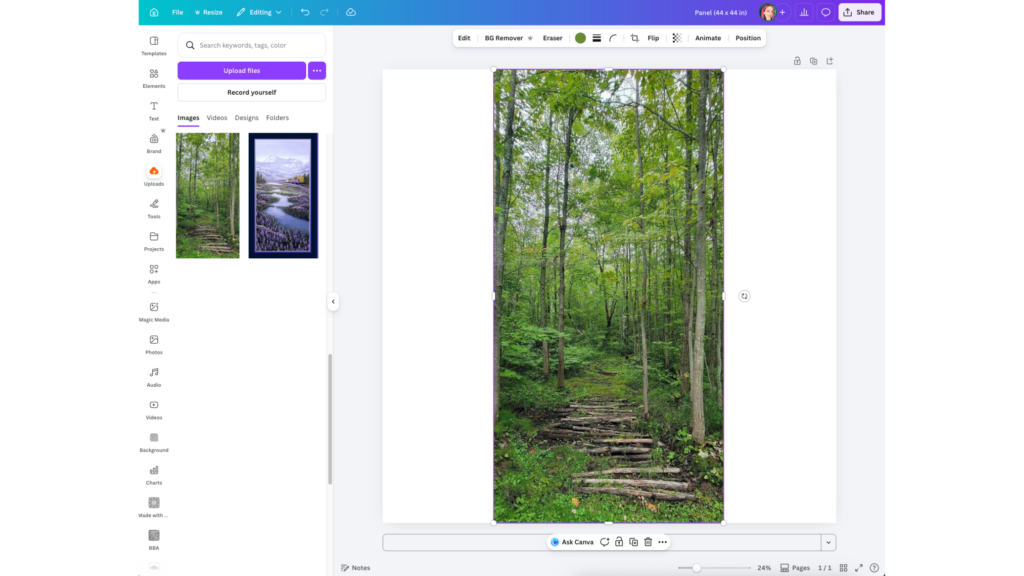
Here we’re using Canva to place the Forest panel onto a 44″ × 44″ square canvas. Canva has a free version, but any photo editing tool will work. The goal is simply to create a square image before loading into Quiltster.
Step 4: Loading the Panel into Quiltster
Load your new custom panel image into Quiltster as normal. Learn how to load fabric into Quiltster here.
Important: Enter the Swatch Size as the size of your canvas, not the size of the original panel.
In our example, we put our panel onto a square canvas of 44” x 44”. This would make our Swatch Size: 44
Once uploaded:
- Add your panel to the correct space within your panel-friendly pattern.
- Test out different block options for sashing if you like.
- Audition border fabrics to finish your project!
Pro tip: If your panel appears to repeat inside your project, recreate your canvas at slightly larger size. Remember to update your Swatch Size when reloading your new image.
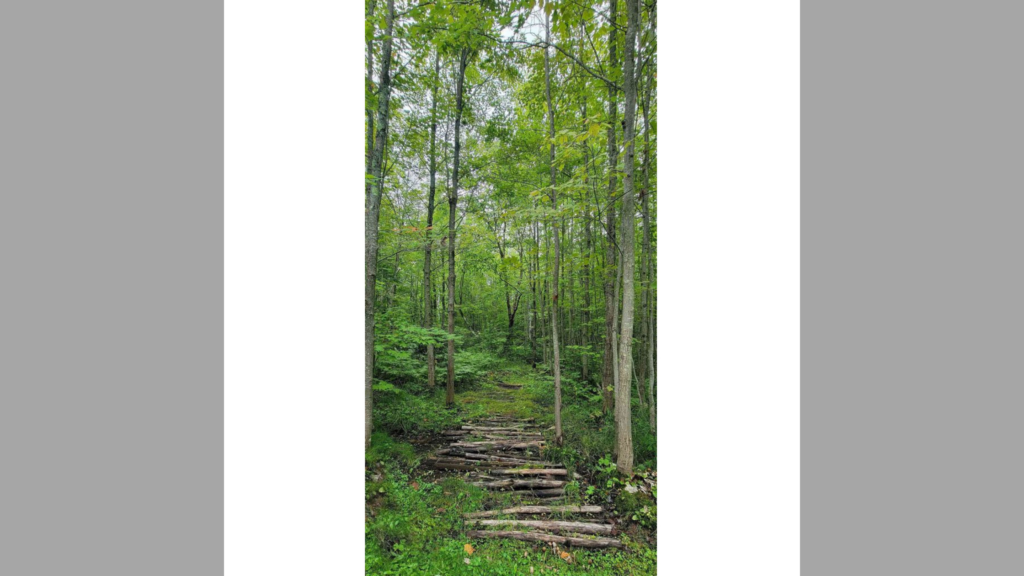
How a Panel looks when loaded in it's original state
Here is the Forest panel in its original size (24″ × 44″).
When loaded into Quiltster without editing, the image is stretched to fit a square, resulting in a distorted appearance.
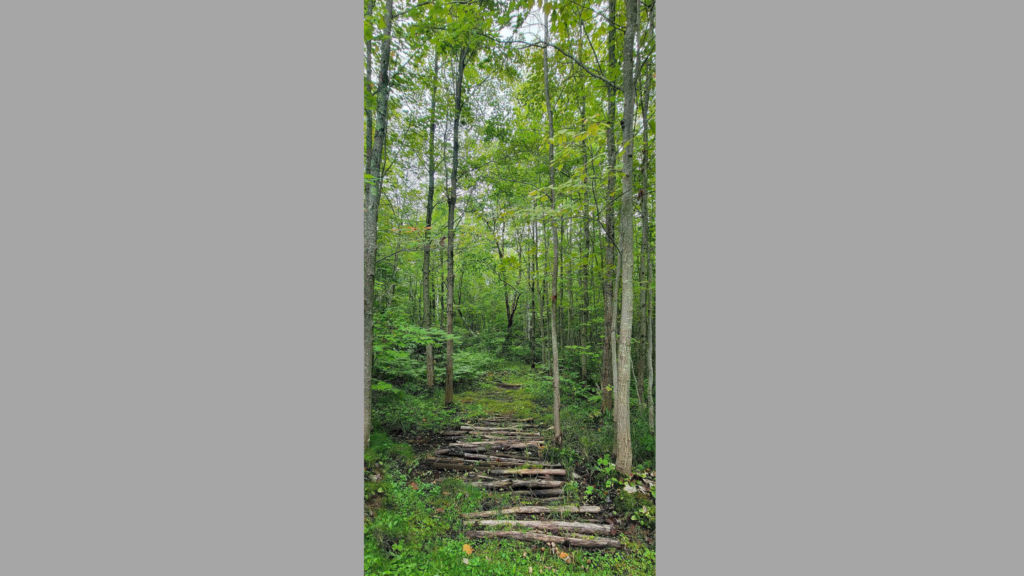
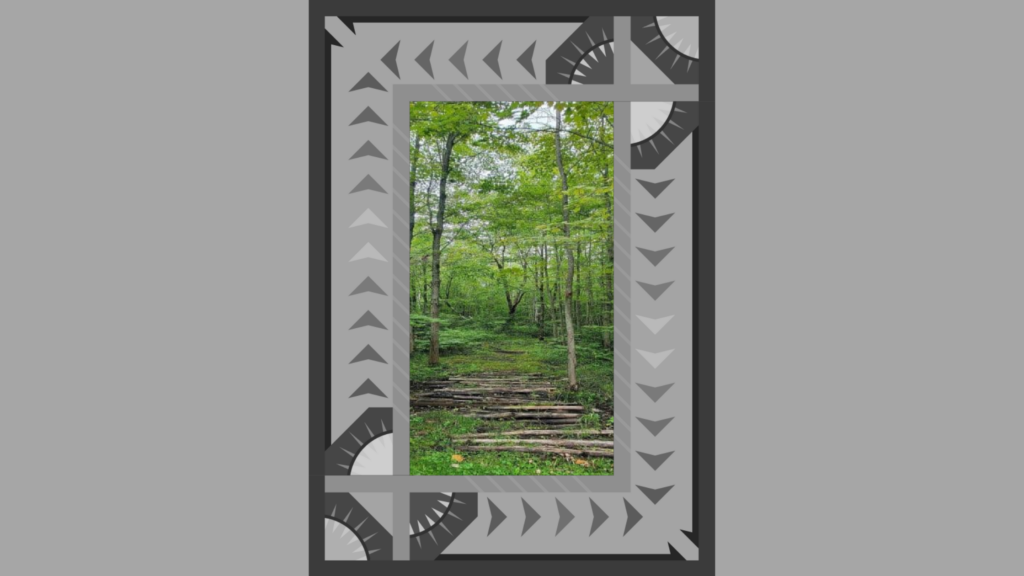
How a Panel looks after editing onto a perfectly square canvas.
Here is the Forest panel placed onto a 44″ × 44″ square canvas.
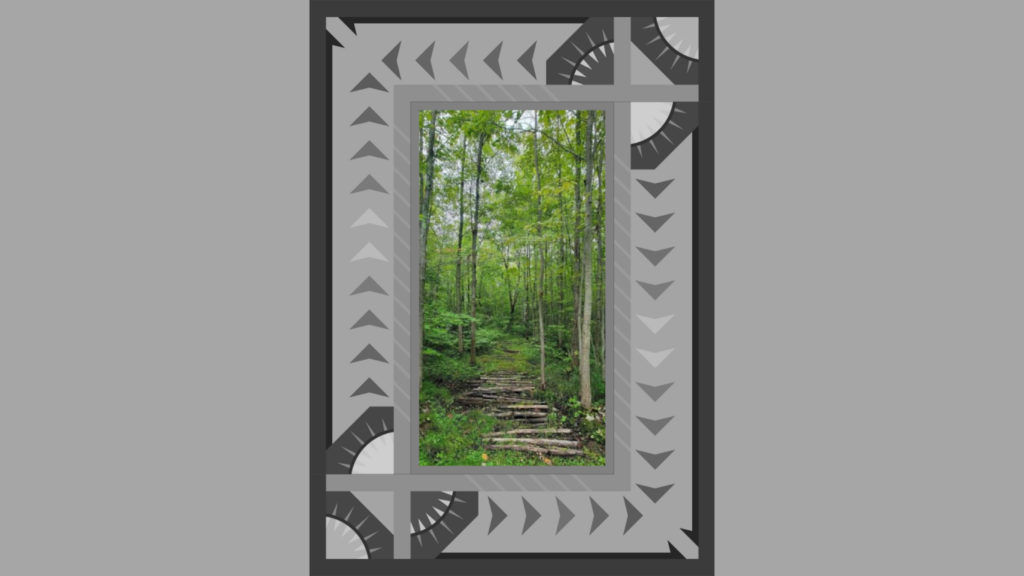
When loaded into Quiltster, the image displays correctly within the panel space. In this example, a 1″ sashing option was also selected to improve the fit.
When Panel Sizes Aren't Exact
Some panels are close to standard sizes like 24″, 30″, or 36″ wide, but they aren’t always exact. Panels may also measure slightly less than the typical 44″ width of fabric.
Because Quiltster formats panel images onto a 44″ square canvas, the panel may visually fill the space even if the actual printed panel is slightly smaller. Keep the real panel dimensions in mind when choosing your template and sashing options.
Sashing can help make up small differences in panel width:
- ½” finished sashing can cover a panel that is up to 1″ smaller than the available opening
- 1″ finished sashing can cover a panel that is up to 2″ smaller
If your panel is even smaller than that, you can simply increase the sashing width.
- If a panel is 3” smaller than the available opening, adjust your sashing to 1 ½”.
- If a panel is is 4” smaller, adjust sashing to 2”
And so on
If your panel is slightly larger than the space, that’s usually easy to solve. Simply trim the panel down to the size needed before assembling your quilt.
Quiltster doesn’t include layouts for endless sashing strip widths, but these guidelines should help you plan panel-friendly projects with confidence.
Why Panels Need Extra Work
Traditional fabric designs repeat designs throughout the fabric. Panels are a single large image.
Quiltster maps your uploaded image into a space originally designed for repeating fabric prints. That’s why we require square uploads and template sizing.
We do plan to build smarter panel handling in the future but for now, these steps give very reliable results.
Final Tips for Success When Loading Your Own Panels
- Always choose the template size first
- Match landscape vs portrait orientation
- Use sashing to help slightly smaller panels fit
- Upload a square image only
- Expect minor cropping, it’s normal
If you follow those rules, you’ll be able to confidently plan your panel quilt and choose fabrics before you ever cut into your panel.
And that’s the real goal. Protecting a fabric you only get one chance to cut.
Happy Quiltstering!
How to Find and Use Pre-loaded Panels
The purpose of this article is to help Quiltster subscribers customize and use their own fabric panel images inside the Quilt Planner.
As of March 2026, the Quiltster team has also begun slowly integrating panel fabrics directly into the Quiltster fabric stash as we add new fabric collections under Quilting Fabric.
When we load panels into Quiltster, we will prepare them in advance by placing the panel image onto a square canvas before importing it. This means you will not need to customize those panels yourself as they will already be ready to use inside your projects.
Using Quiltster-Loaded Panels
When using one of these Quiltster-loaded panels, you simply need to:
Choose the correct template size for the panel
Select the panel fabric from the Quiltster stash
We have altered SKU’s for panels loaded by Quiltster to make them easier to identify. Quiltster-loaded panel SKU’s will include:
- The original SKU
- The original panel size (added by us)
- An abbreviation identifying the square canvas size, e.g. “SQ44″ (added by us, indicating the swatch is a perfect square and is 44″x44”)
For example, here are a few Quiltster-loaded panels:
PANELJNP-CD4080-FOREST_24x44 SQ44
PANEL-CD4350 MULTI_24x44 SQ44
No Fish Today PANEL_36x43 SQ44
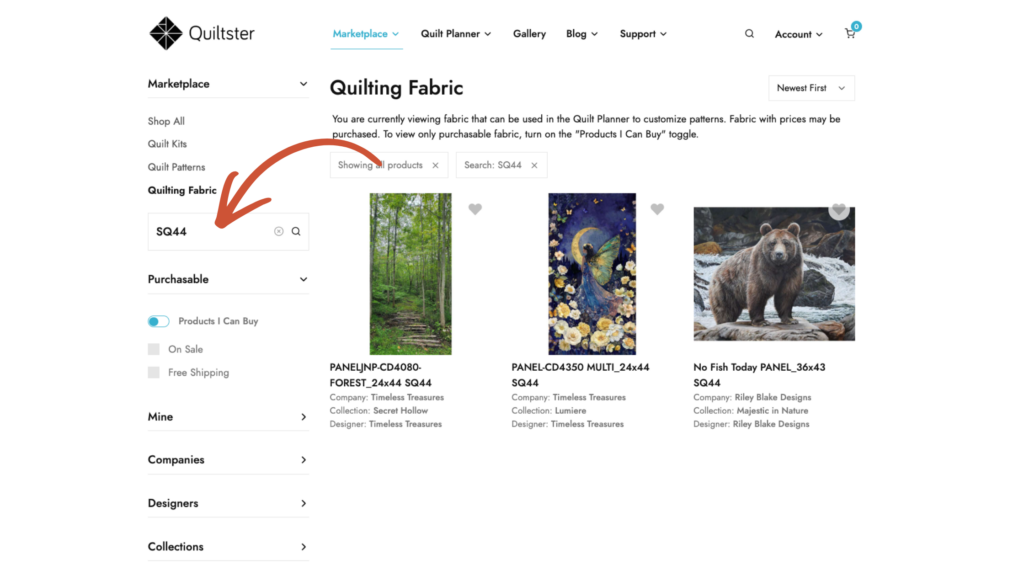
Finding Quiltster-Loaded Panels
To find Quiltster-loaded panels, you can use the search feature inside Quilting Fabrics.
Simply type “SQ44” into the search bar. This will pull up every panel SKU that has been prepared and imported by the Quiltster team using the square canvas format.
Ready to try Quiltster for yourself?
Start designing your own quilt projects, experiment with fabrics (and panels!), and calculate yardage with ease.
✨ Subscribe to Quiltster and start planning today.